Profiling
The profiling feature on ISE allows you to dynamically detect and classify endpoints on your network. Endpoint profiles ...
The profiling feature on ISE allows you to dynamically detect and classify endpoints on your network. Endpoint profiles can then be used in authorization rules. A key component in the profiling architecture is the profiling policy. In this blog post, we will look at how the process of creating profiling policies can be automated using Pandas, a popular data analysis library for Python. This would be of most benefit to you if you have to create a large number of policies - for instance, if you have a significant number of unique IoT devices that require access to your network - and where you have the specifics of your desired policy documented in a spreadsheet.
Profiling Overview
Before we jump into the details, let’s first say a few words about how profiling works in ISE. At a high level, there are three basic steps:
- Probes are used to gather information about endpoints on your network.
- The information gathered from probes is matched to a profile.
- This profile is referenced in authorization rules that specify the level of access the endpoint has on the network.
Let’s now dive a bit deeper into how profiling works on ISE, with a focus on the profiling policy. Understanding how the key components in profiling work together will help us make sense of the code.
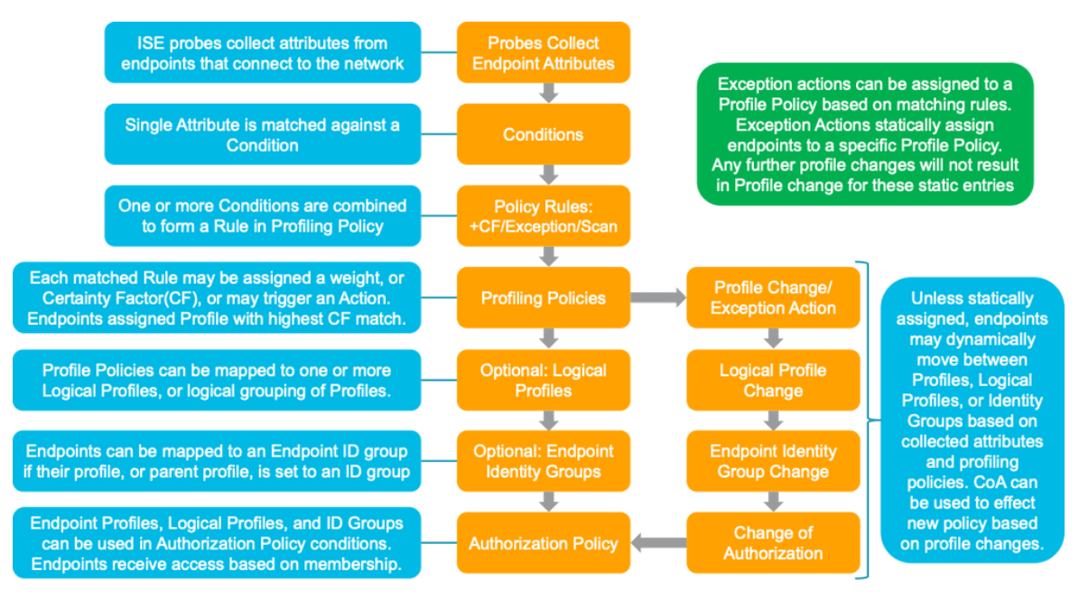
As noted above, you have the ability to collect data from endpoints on your network so as to gain visibility into their identity. Precisely what kind of data you can collect from endpoints depends on how you have setup your network environment to support the probes you choose to enable.
After enabling the specific probes you would like to use, and after setting up your network devices appropriately, ISE will compare the attributes it collects from endpoints to Conditions, which are pre-built or can be user-defined. A single attribute is matched against a Condition. It’s worth noting that Conditions are also referred to as “checks,” which I personally find to be a little more helpful way to think about this concept.
Next, one or more Conditions are combined to form a Rule. Rules are associated with weights or CertaintyFactors. Basically, a Rule says how the presence of certain Conditions should contribute to the certainty we wish to have about the actual identity of the endpoint.
Finally, Rules are embedded into a Profiling Policy. A key variable in the Profiling Policy is the Minimum Certainty Factor. This specifies how great the accumulated weight or Certainty Factors gleamed from Rules needs to be in order for ISE to label the endpoint.
This may all be a little too abstract. To make it more concrete, let’s look at an example.
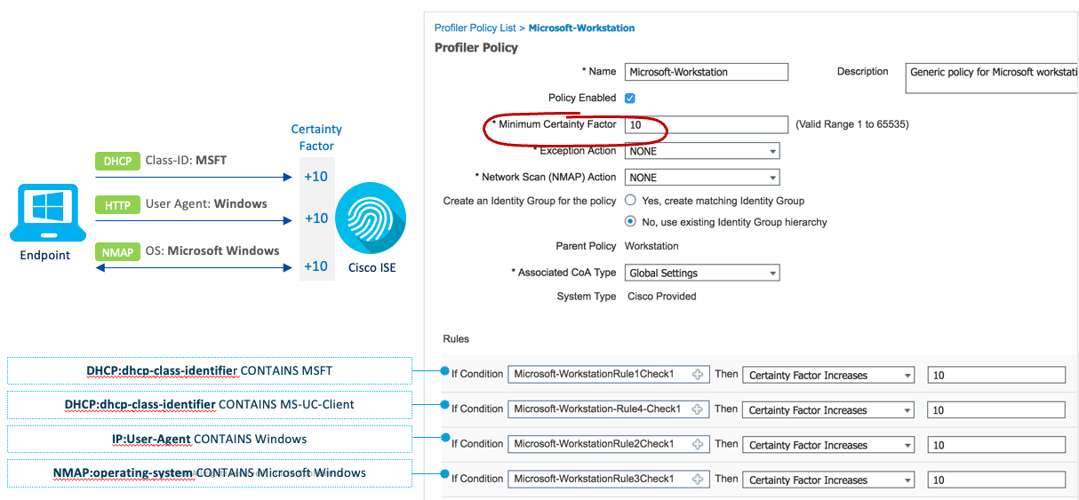
In this example three probes are being leveraged: DHCP, HTTP, and NMAP. Each of these probes collects attributes from the endpoint. For example, the NMAP probe learns about the OS of the device.
Next, let’’s notice the Conditions. There are four in this example. With respect to NMAP, the condition is "NMAP:operating-system CONTAINS Microsoft Windows." It should be pointed out that “contains” is a logical operator, and that you have a choice of what kind of operator you would like to use in your conditions. For instance, you could use “equals.”
The four Conditions in this example are each embedded into individual Rules. With respect to the NMAP condition noted above, the specific Rule in the Policy says that if the NMAP probe into the endpoint learns that its OS is Microsoft Windows, to increase the weight by 10 points.
The final thing to point out is that in this example, the Profile Policy (Microsoft-Workstation) is made of four Rules, and that it has a Minimum Certainty Factor of 10. This means that if any of the Conditions hit, according to our Rule, it is sufficient to label the endpoint as a Microsoft Workstation.
Writing Profile Policies in ISE
Of course, you have the option to write policies, one-by-one, using the ISE GUI. If you only have to write a handful of policies, this would not be much of a problem. But what if you have to write dozens and dozens of policies? This could be a tedious and time-consuming process, and one that could easily, inadvertently lead to an error and misconfiguration.
It’s in this context that I want to point out that you do not have to use the ISE GUI to write your profiles. You have the option of writing profiles in XML and then importing your XML file into ISE. Of course, if your XML file is to import successfully, it will need to be written in the right way.
XML
If you are unfamiliar with XML, it is a markup language like HTML, except that it uses ‘tags’ to store and transport data (instead of displaying data, like HTML). Also, unlike HTML, tags are not pre-defined. Below is an example of a typical XML structure using some demo data.
<?xml version='1.0' encoding='utf-8'?>
<data>
 <row>
 <index>0</index>
 <name>Alice</name>
 <major>Computer Science</major>
 <age>20</age>
 </row>
 <row>
 <index>1</index>
 <name>Bob</name>
 <major>Philosophy</major>
 <age>22</age>
 </row>
 <row>
 <index>2</index>
 <name>Mary</name>
 <major>Biology</major>
 <age>21</age>
 </row>
</data>
It should be noted that this same data can be represented in a different, more condensed structure:
<?xml version='1.0' encoding='utf-8'?>
<data>
 <student name = "Alice" major = "Computer Science" age = "20"/>
 <student name = "Bob" major = "Philosophy" age = "22"/>
 <student name = "Mary" major = "Biology" age = "21"/>
</data>
The reason why I draw your attention to this different format option is that ISE expects XML to be written in a more condensed way. This is to say, at least based on my testing - and I could be wrong about this; please let me know - ISE will not accept XML formatted in the traditional way. This presented a bit of a challenge for me as I could not use the XML ElementTree module in Python. Instead, I had to resort to ‘hard coding’ my desired XML structure in code, which I share below.
Let’s look at an example of what a simple policy - that is, a policy that uses one condition, in one rule - might look like in a condensed XML format.
<?xml version="1.0" encoding="ISO-8859-1"?>
<CPMProfilerPolicies>
 <Policies>
 <Policy description="" isEnabled="true" matchingIdentityGroup="false"
 minimumCertaintyMetric="10" name="IoTAssetPolicy" version="2">
 <PolicyRules>
 <PolicyRule certaintyFactor="10" name="IoTAssetPolicyRule" />
 </PolicyRules>
 </Policy>
 </Policies>
 <Rules>
 <Rule description="TestIoTAssetCondition" expression="IoTAssetCondition"
 name="IoTAssetPolicyRule" ruleType="Regular" />
 </Rules>
 <Checks>
 <Check attributeName="assetDeviceType" attributeValue="IoTValue" description=""
 name="IoTAssetCondition" operator="Equals" type="IoTAsset" />
 </Checks>
 <Actions />
 <ScanActions />
</CPMProfilerPolicies>
Let me walk you through this.
Let’s look at the first child element, which is Policies. This is where all of your Policies would be coded, each as a child element of the Policies element. In this example, the policy in question is named “IoTAssetPolicy” and has a minimum Certainty Factor (that is, a “minimumCertaintyMetric”) of 10.
Notice that there is a child element under the Policy element called PolicyRules. This is where you specify the Rule(s) you will be referencing in your Policy. This Policy has a single Rule, “IoTAssetPolicyRule.” Note that you do not write the Rules here. You simply reference the Rule you want to use, and the certaintyFactor you want to associate with it.
Rules are written in the next child element, Rules. Note that the name of the Rule here must match the name of the Rule referenced in PolicyRules above. The key feature of the Rule here is that it references the Condition to be used in it. This is the element expression, which in this case is “IoTAssetCondition.”
The final element to discuss is Checks, which is where you write the Conditions - that is, Checks - that you will use. The name of the Check must correspond to the Rule expression referenced above. Basically, this Condition checks to see if the “assetDeviceType” is equal to an “IoTValue.” Of course, this information is learned from ISE probes.
Excel
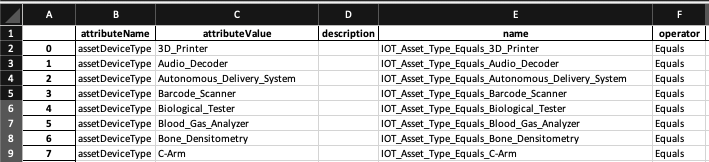
The next thing to talk about is where the actual data that we will use is stored. The answer is that it should be placed in a spreadsheet using a tool like Microsoft Excel.

If we examine the sample Excel spreadsheet above, notice two things. First, each row should correspond to a new Policy. Second, each column corresponds to one of the elements that you will specify within the policy.
There is nothing really preventing you from filling in corresponding elements for Rules and Checks in the same row, of course with different column attributes. However, I personally find it easier to simply create a new sheet for all of the child elements, as you can see in the Checks sheet below. Just keep in mind that the index used in each sheet should be consistent, so that the appropriate Policy information for the Policy in row 1 is located in row 1 in the Check sheet, and so on.
One last comment. You don’t necessarily have to manually write data into each cell of each sheet! You can take advantage of Pandas vector operations where it is appropriate to do so. It is beyond the scope of this blog post to get into specifics about this, but here is an example of what I mean. The code below fills out the Check spreadsheet with minimal work on my part.
check['operator'] = 'Equals'
check['attributeValue'] = policy['name'].str.replace('Medigate_','')
check['attributeName'] = 'assetDeviceType'
check['name'] = 'IOT_Asset_Type_Equals_' + check['attributeValue']
Pandas
Let's assume you have all of your data in spreadsheets. Now you can leverage Pandas itterrows() method to iterate through it. First, however, you’ll need to import Pandas and create DataFrames from your spreadsheets like this:
import pandas as pd

# load excel file
xslx = 'ExcelSheet.xlsx'

# create dataframes
policy = pd.read_excel(xslx, sheet_name=1)
rule = pd.read_excel(xslx, sheet_name=3)
check = pd.read_excel(xslx, sheet_name=4)
At last, with all of our data in Panda-native DataFrame objects, we can iterate through it using the Pandas itterrows() method. The only issue is how to convert the data from our sheets into the XML format? As I noted above, because ISE seems to expect a condensed XML document, I found that I was unable to write elements using XML ElementTree, and pass the data to these elements. Instead, I had to ‘hard code’ my desired XML structure in Python. It looks like this:
# Create the string.
string = ''

string += '<?xml version="1.0" encoding="ISO-8859-1"?><CPMProfilerPolicies>\n'
string += '<Policies>\n'

# Iterate over the rows of the Policy dataframe
for row in policy.iterrows():
 # Define a variable for each value in the row
 description = row[1]['description']
 isEnabled = row[1]['isEnabled']
 matchingIdentityGroup = row[1]['matchingIdentityGroup']
 minimumCertaintyMetric = row[1]['minimumCertaintyMetric']
 name = row[1]['name']
 version = row[1]['version']
 certaintyFactor = row[1]['certaintyFactor']
 id = row[1]['id']

 # Insert the variables into the condensed structure for Policy element
 string += '<Policy description="{}" isEnabled="{}" matchingIdentityGroup="{}" minimumCertaintyMetric="{}" name="{}" version="{}">\n'.format(description, isEnabled, matchingIdentityGroup, minimumCertaintyMetric, name, version)

 string += '<PolicyRules>\n'

 # Insert the variables into the condensed structure for PolicyRules element
 string += '<PolicyRule certaintyFactor="{}" name="{}" />\n'.format(certaintyFactor, id)

 string += '</PolicyRules>\n'

 string += '</Policy>\n'

string += '</Policies>\n'

string += '<Rules>\n'

# Iterate over the rows of the Rule dataframe
for row in rule.iterrows():
 # Define a variable for each value in the row
 description = row[1]['description']
 expression = row[1]['expression']
 name = row[1]['name']
 ruleType = row[1]['ruleType']

 # Insert the variables into the condensed structure for Rule element
 string += '<Rule description="{}" expression="{}" name="{}" ruleType="{}" />\n'.format(description, expression, name, ruleType)

string += '</Rules>\n'

string += '<Checks>\n'

# Iterate over the rows of the Check dataframe
for row in check.iterrows():
 # Define a variable for each value in the row
 attributeName = row[1]['attributeName']
 attributeValue = row[1]['attributeValue']
 description = row[1]['description']
 name = row[1]['name']
 operator = row[1]['operator']
 type = row[1]['type']

 # Insert the variables into the condensed structure for Check element
 string += '<Check attributeName="{}" attributeValue="{}" description="{}" name="{}" operator="{}" type="{}" />\n'.format(attributeName, attributeValue, description, name, operator, type)

string += '</Checks>\n'

string += '<Actions/>\n'
string += '<ScanActions/>\n'
string += '</CPMProfilerPolicies>'


# Print the string. Save as an XML file.
print(string)
Conclusion
If you are interested in automating Profile Policy in ISE, I hope that this write-up has provided you with some inspiration. Please feel free to get in touch if you have questions or comments about profiling - or really about anything - using ISE.