Cisco AnyConnect is - or, was - Cisco’s VPN client offering. I say ‘was’ because AnyConnect is now referred to as ...
Cisco AnyConnect is - or, was - Cisco’s VPN client offering. I say ‘was’ because AnyConnect is now referred to as Secure Client. It would be a mistake, however, to think that this is a simple rebranding exercise, and that Secure Client is functionally identical to AnyConnect. To be sure, AnyConnect VPN remains the core application of Secure Client. But it is a mistake to conflate the two because Cisco Secure Client - while including AnyConnect - can offer you much more than a VPN client. Secure Client has the potential to house a suite of security tools, including Secure Endpoint (formerly known as AMP), Umbrella, and ISE Posture. This means that you can deploy robust security to endpoints in a clean and minimally intrusive way. With a single installation of Secure Client, a device can be protected against malware with Secure Endpoint, it can be protected on the Internet with Umbrella, it can keep your network protected with ISE Posture, and has a VPN client to boot! In this blog post, we will look at how to set this up using SecureX.
SecureX
SecureX is Cisco’s cloud-native incident and threat response platform. It integrates the Cisco Security portfolio as well as third-party security platforms. This means that SecureX provides a single pane of glass for visibility, detection, and response. Because of SecureX’s integrative nature, it is the ideal launching point for deploying an integrated security solution to endpoints. Our main objective will be to integrate Cisco security solutions with SecureX. Once we have accomplished this, we can use Secure Client Deployment Management on SecureX to create a custom instance of Secure Client that can be installed on endpoints. Let’s get started by creating a SecureX account. If you have a Cisco security product, then you have access to SecureX. Navigate to security.cisco.com and create a new account. Or, if you already have an account, log in to your existing account.
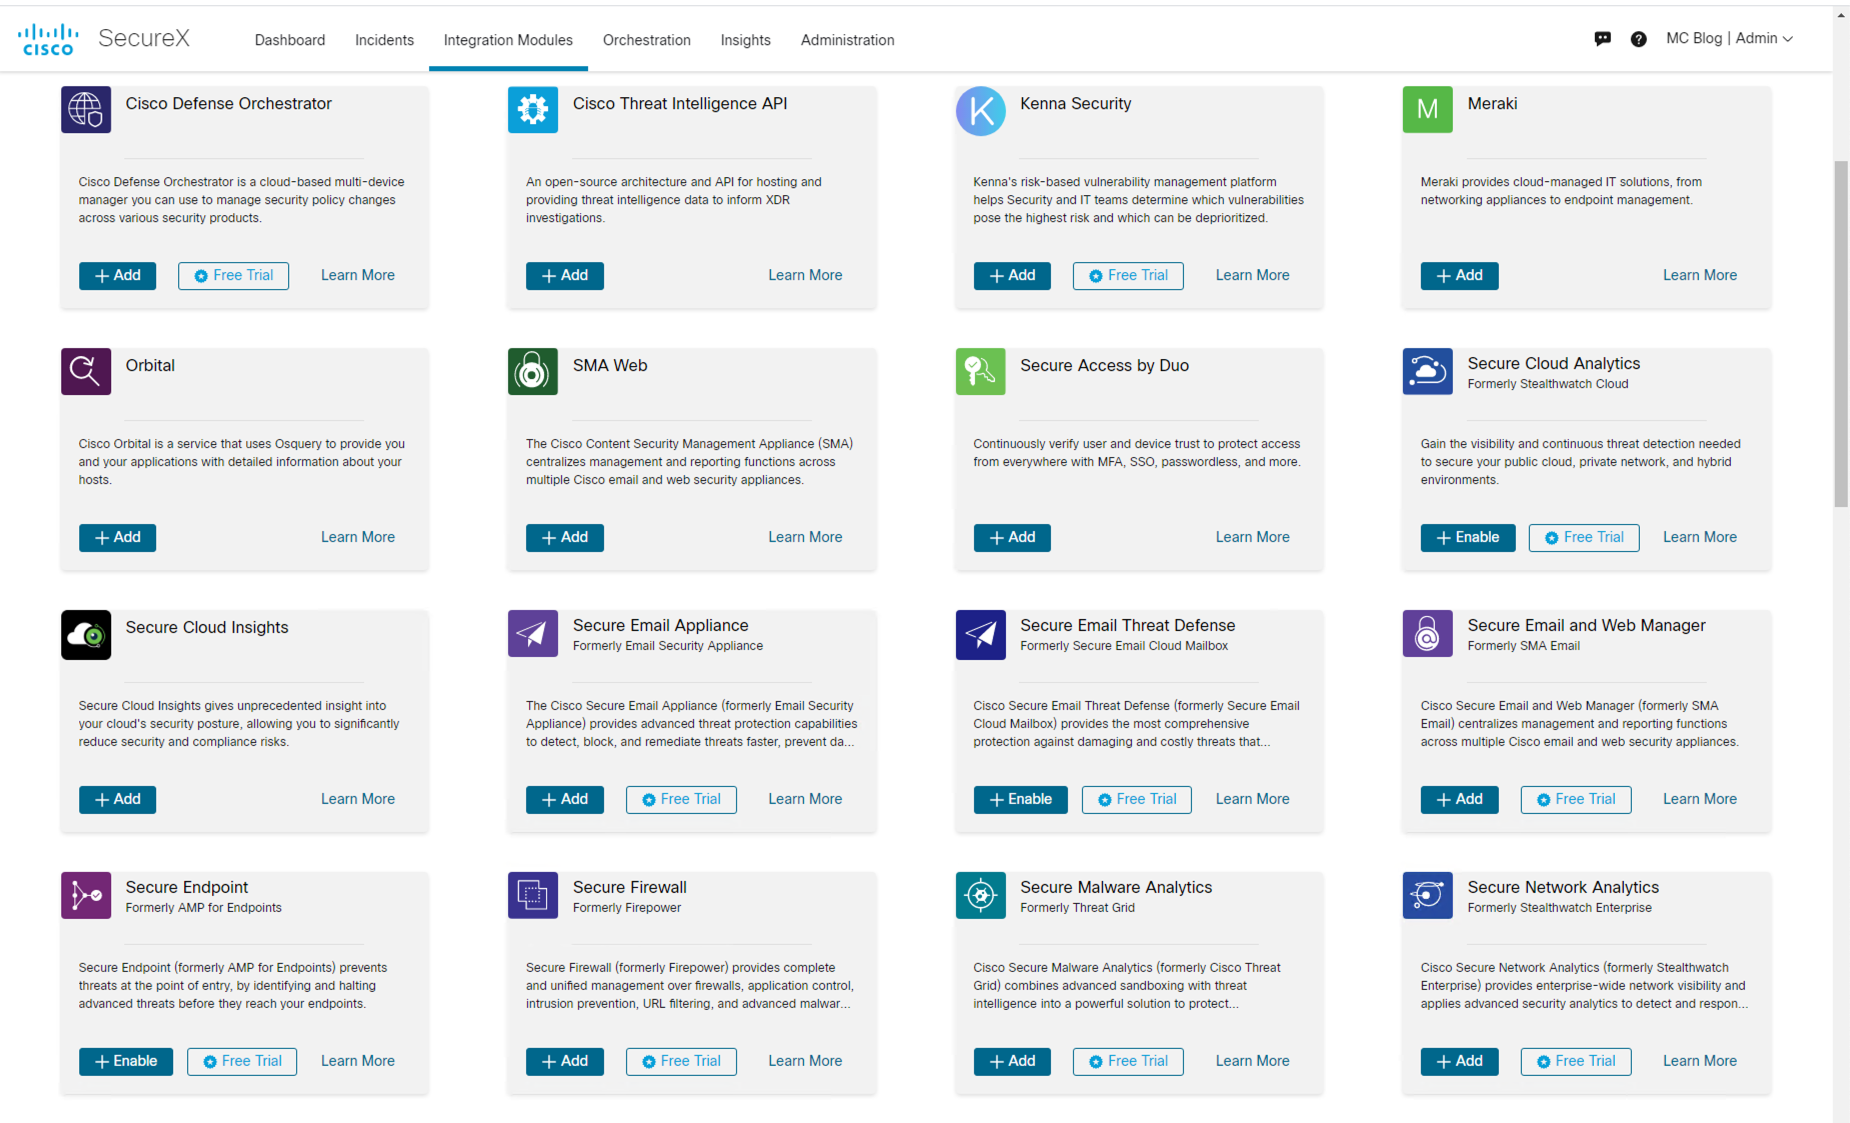
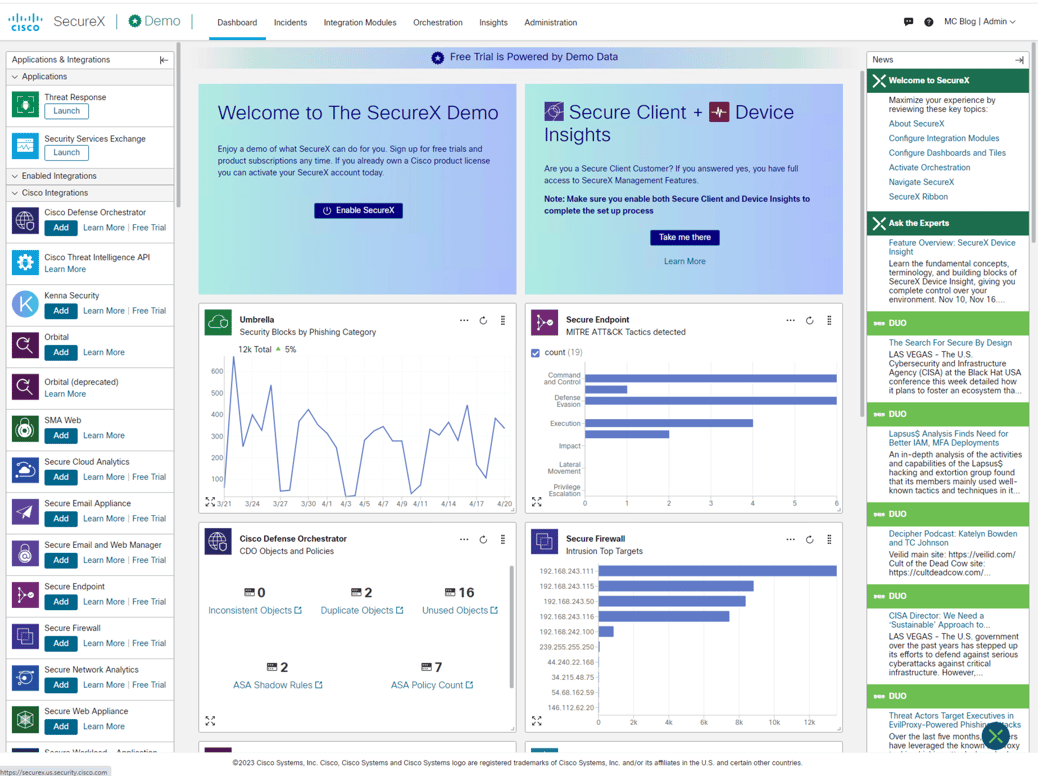
In Figure 1, we see the SecureX homepage. The utility of SecureX is obvious. It brings together data from all of your security products into one place. Let’s navigate to Integration Modules to see all of the security tools - by Cisco and by third parties - that can share their data with SecureX. As you can see in Figure 2, there are a lot of options!
 Figure 1: SecureX homepage
Umbrella
Umbrella’s core security feature is DNS protection. But it offers much more than that! For example, Umbrella’s cloud-delivered firewall provides firewall service without the need to deploy, maintain, and upgrade physical or virtual appliances on-site. Regardless of what use cases you might have in mind with Umbrella, how it integrates with SecureX will be the same. Find the Umbrella widget on the Integration Modules page, and click add. As you can see in Figure 3, there are a number of variables that should be inputted into SecureX to enable the integration. Note the helpful Quick Start guide on the page, which explains how to find the required information.
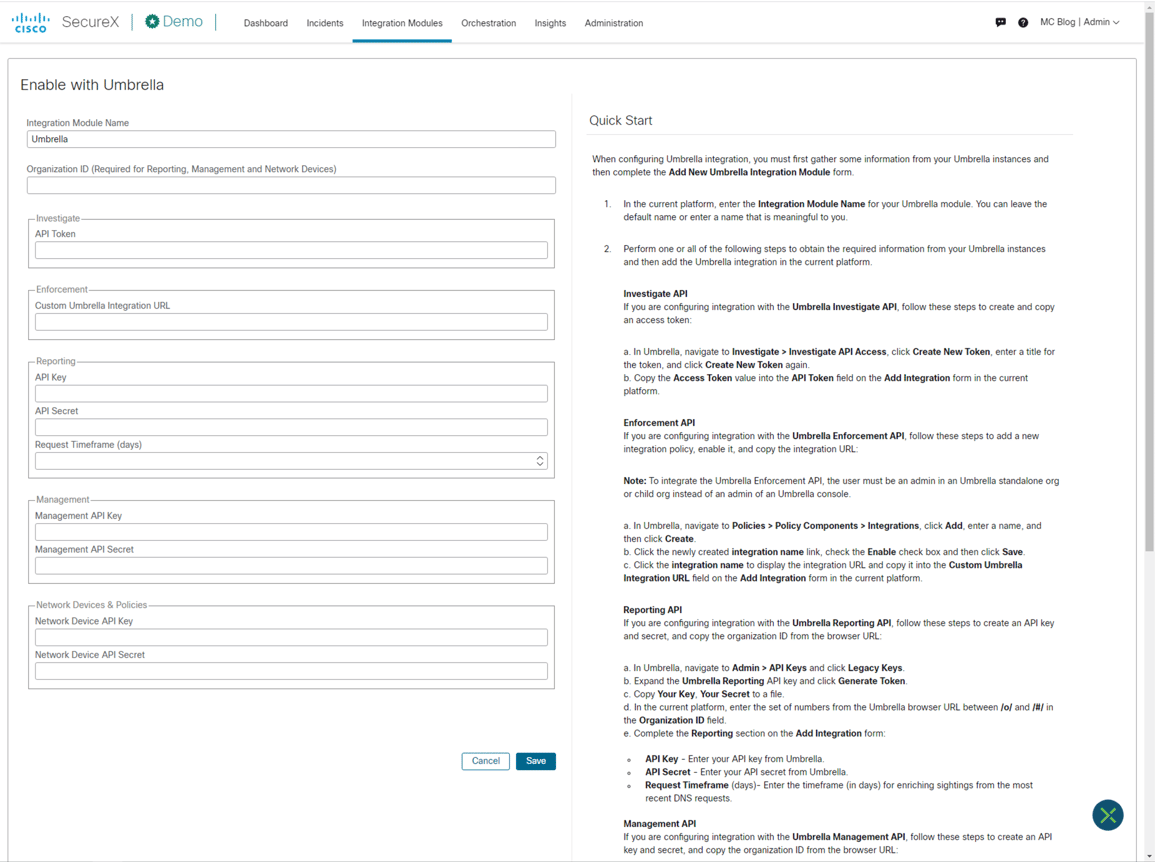 Figure 3: Enable SecureX with Umbrella
Organization ID
Let’s get started with Organization ID. The simplest way to find your Organization ID is to login to Umbrella. Once you login, take note of your URL. It should look something like this: https://dashboard.umbrella.com/o/XXXXXXX/#/… The number between the ‘o’ and ‘#’ is your organization ID.

Figure 4: Umbrella Organization ID
Investigate API
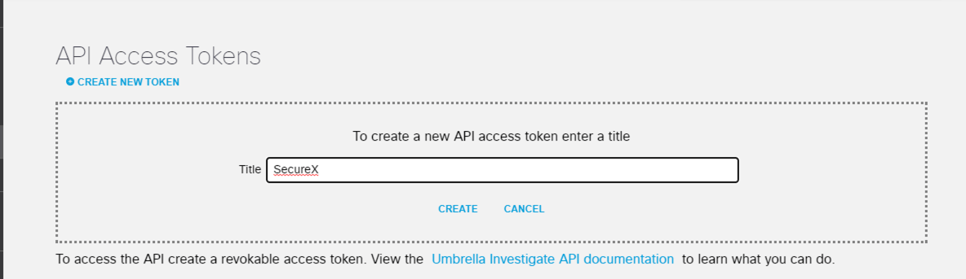
To find the Investigate API, from the Umbrella dashboard, navigate to Investigate > API Keys.
You’ll want to create a new API access token for the SecureX integration.
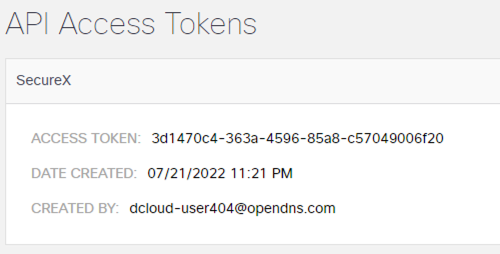
Copy and paste the newly created Access Token into the SecureX Umbrella enablement page.
Enforcement URL
To find the Integration URL, from the Umbrella dashboard, navigate to Policies > Policy Components > Integration Settings.
Give your integration a name and enable it. Copy the Integration URL and paste it into SecureX. Finally, don’t forget to save your newly created integration!

Reporting, Management, and Network Devices & Policies APIs
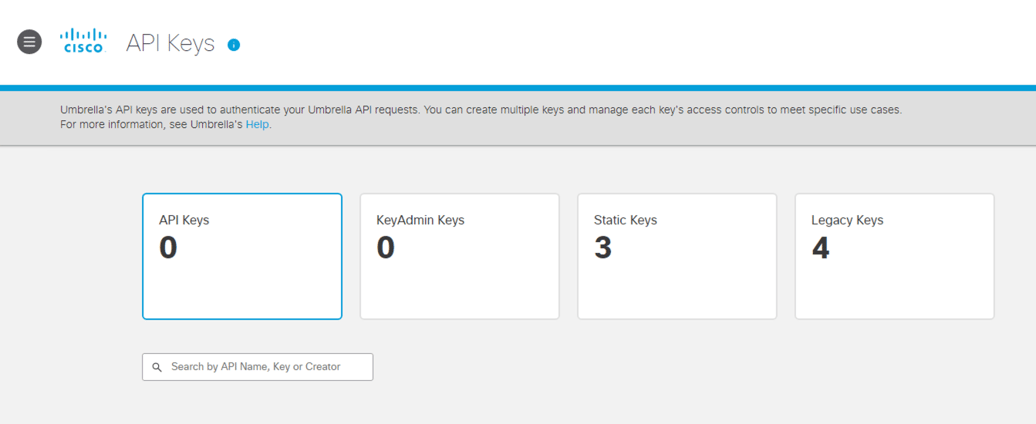
The Reporting, Management, and Network Devices & Policies APIs are all found in the same place. From the Umbrella dashboard, navigate to Admin > API Keys.
From here, you’ll want to select Legacy Keys. This is where you will find APIs for Umbrella Network Devices, Legacy Network Devices, Umbrella Reporting, and Umbrella Management. Note that we will not be using the Legacy Network Devices for our enablement.
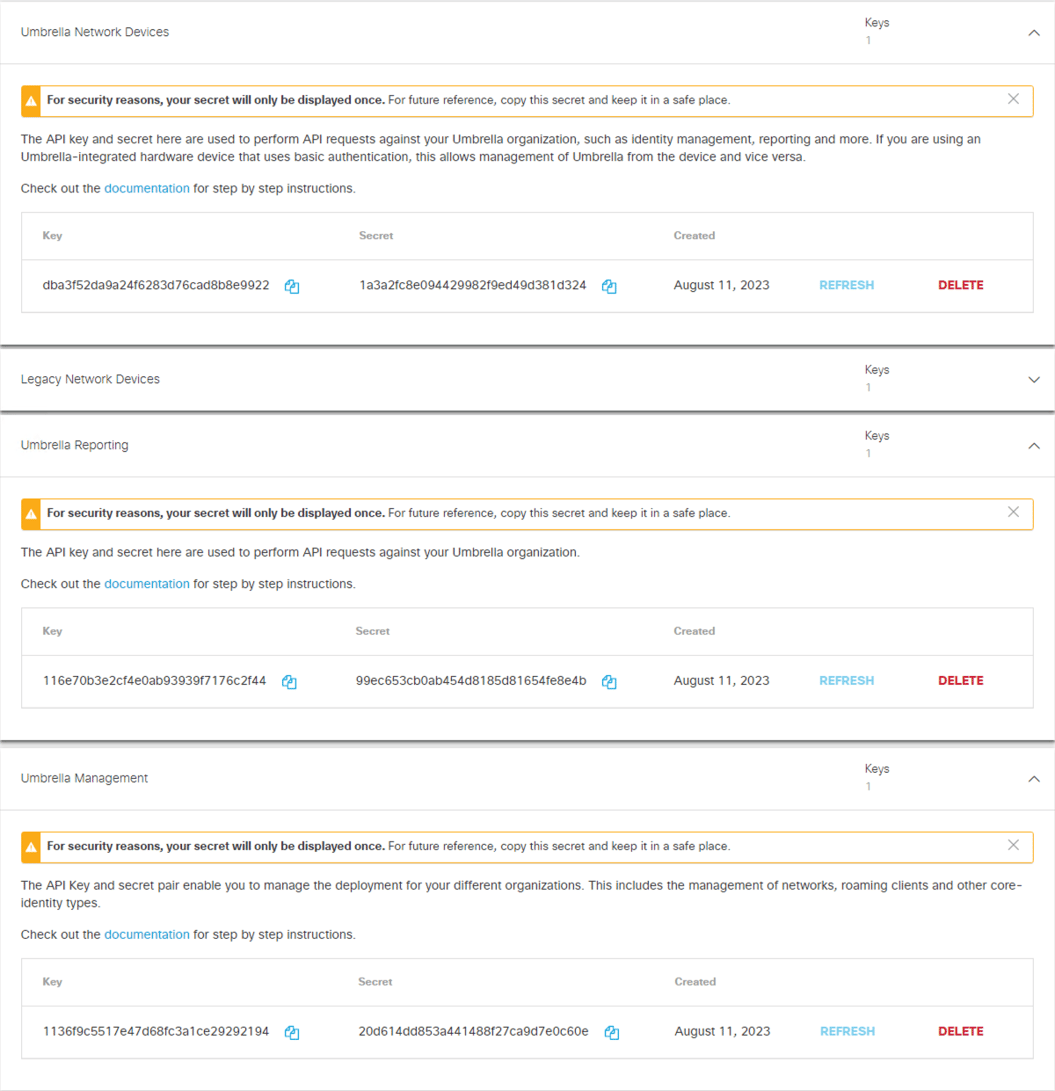
Copy and paste the information into SecureX.
Verify
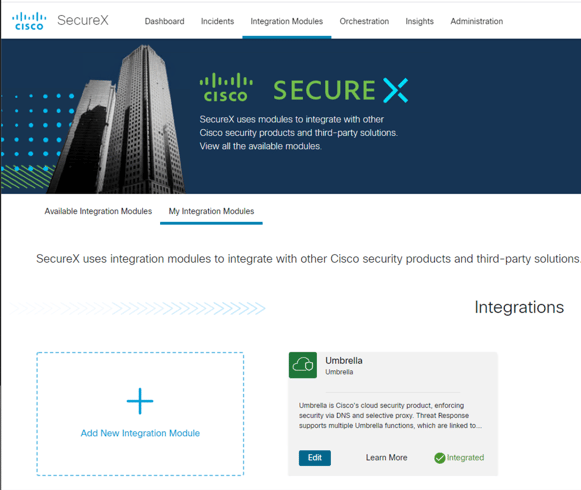
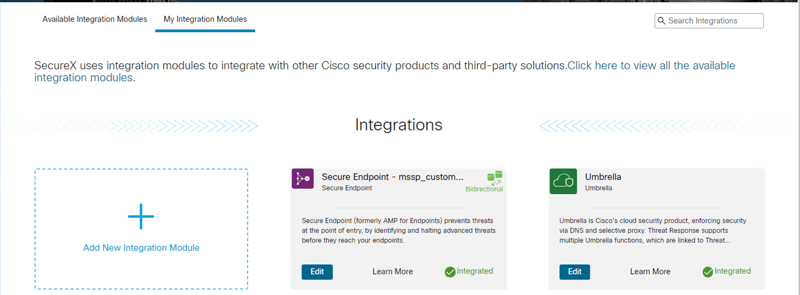
After you have entered all of the required information into SecureX to enable the Umbrella integration, you can verify the integration by navigating to the submenu of My Integration Modules.
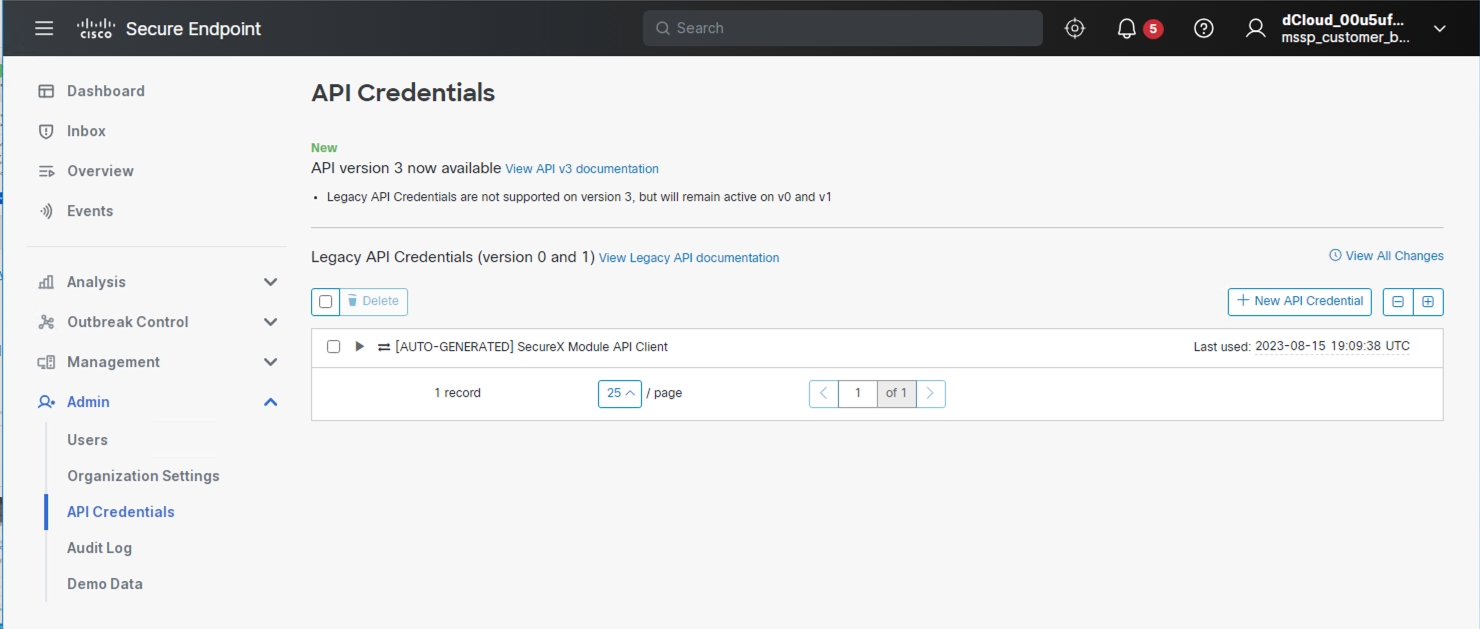
Secure Endpoint
We’ll basically repeat the workflow above to enable the Secure Endpoint integration with SecureX.
To begin, in SecureX navigate to Integration Modules, find the Secure Endpoint widget, and click to add it.
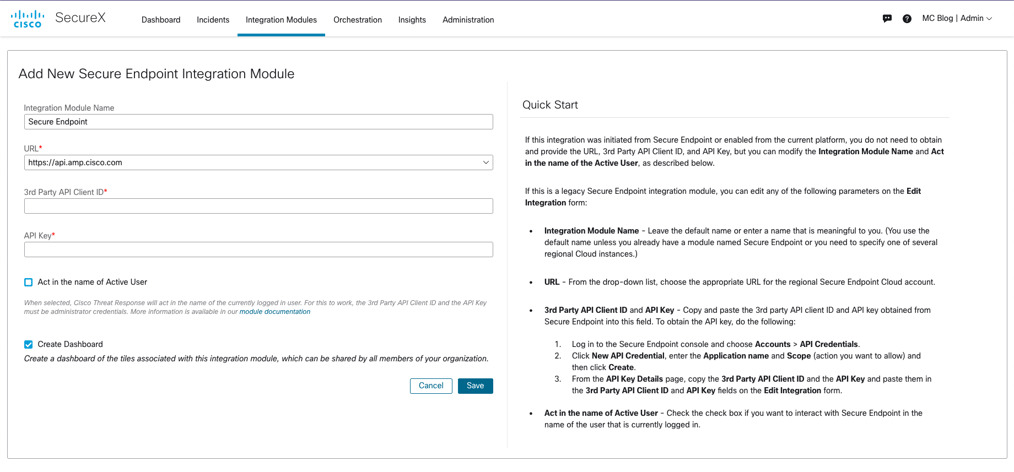
As you can see in Figure 14, compared to the Umbrella integration, there is less information that we need to input in SecureX to enable the Secure Endpoint integration; there is only one API. Before detailing how to find this information, note that the URL you will want to use will depend on your region.
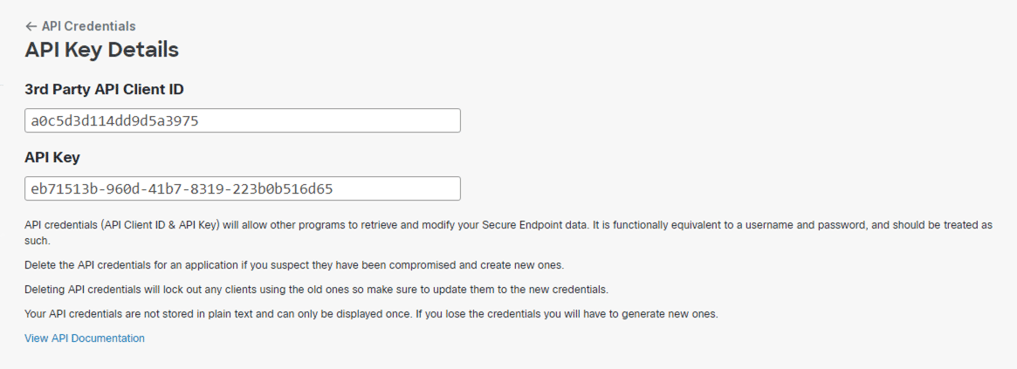
3rd Party API Client ID & API Key
To find this information, login to Secure Endpoint. From the Secure Endpoint dashboard, navigate to Admin > API Credentials.
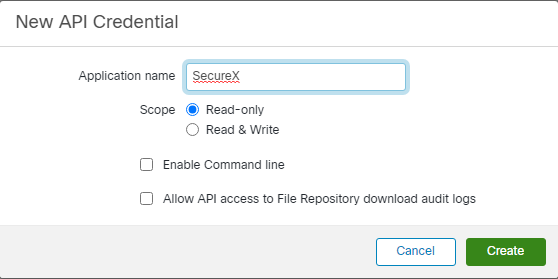
On the API Credentials page, click on New API Credential.
Give your new API Credential a name. You have some options about how to configure the API. Choose what is best for your circumstance.
Upon creating a new API Credential, the credentials will be generated. Copy and paste this information into SecureX.
Verify
As before, to verify your integration, you can navigate to the My Integration Modules submenu to note the status of your integration.
Deploy Secure Client using SecureX
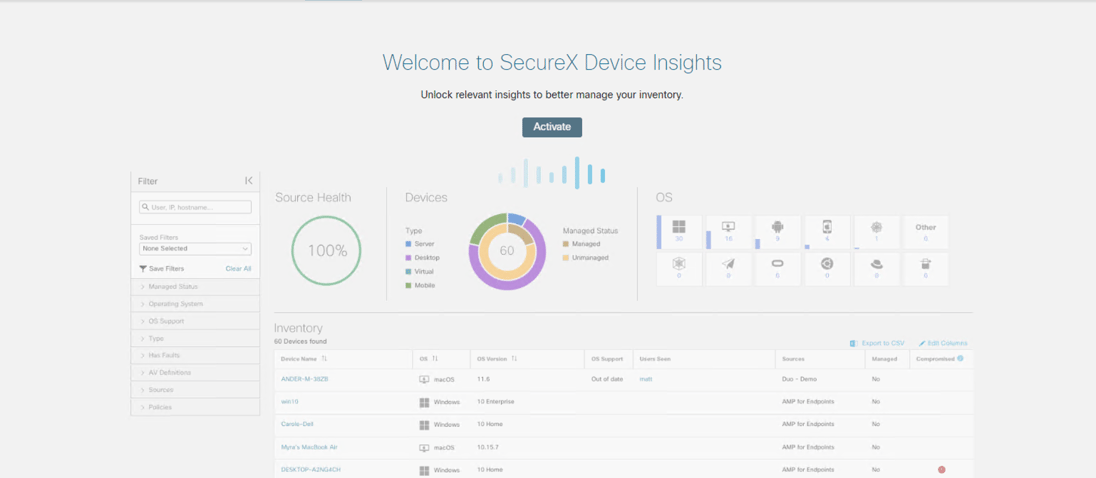
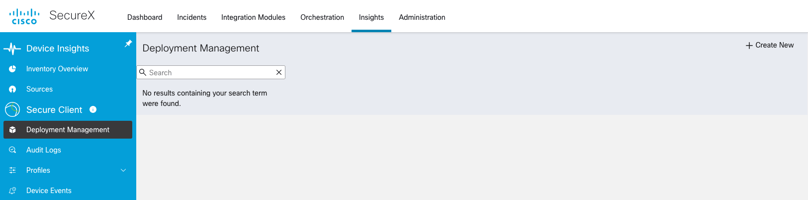
To access Deployment Management, from the SecureX homepage, click on Insights. If you have never done this before, you will be asked to activate this service.
From here, under the Secure Client heading, choose Deployment Management, and then Create New Deployment.
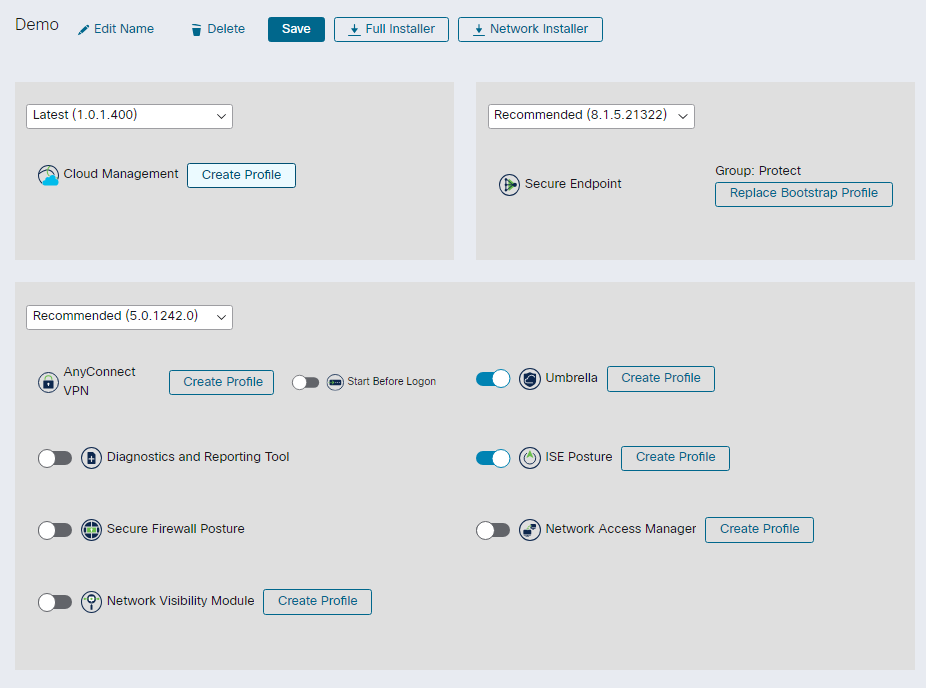
Once you choose to create a new deployment, you will be presented with a page where you can configure your deployment, as seen in Figure 23.
At a high level, what you notice first is that you have an option of what security tools you would like to include in this deployment instance. For example, you could choose to include Network Access Manager, or not. Since this blog post is not concerned with NAM, we will choose not to do this in this deployment instance.
You’ll also notice Cloud Management in the top left. This is something we have not spoken about it, but as the name suggests, it is the mechanism that controls or manages the Secure Client endpoint software.
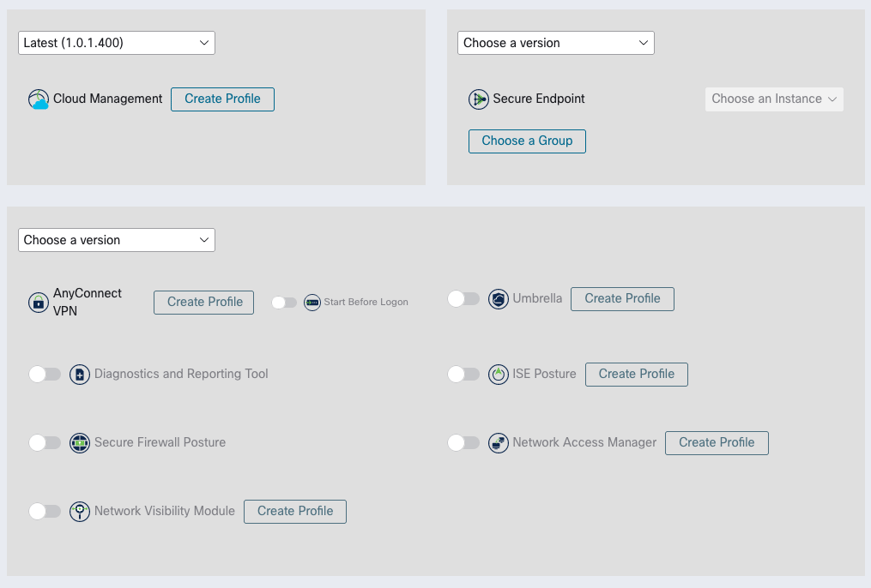
The next item to discuss is profiling. A profile allows you to customize the configuration of each element of Secure Client in a modular way. You can either create a new profile or upload a profile that you have already built elsewhere. Note that Secure Endpoint does not give you the option to create a profile; rather it asks you to choose a group. This is analogous to profile in the sense that it has to do with how you want to configure Secure Endpoint.
If we consider the Cloud Management profile, for example, as in Figure 24, we see that this gives us the option to specify how we would like to control logging and updating Secure Client. If you do not create a custom profile for Cloud Management, it will run with the default settings, which are seen below.

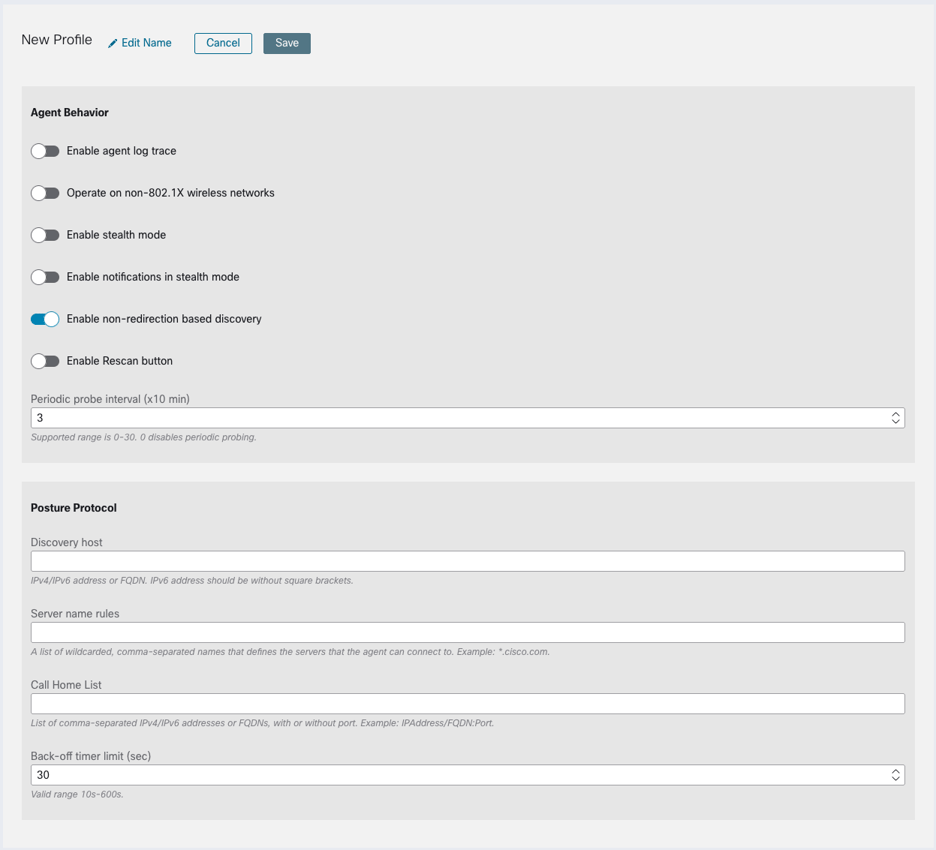
Since we want to include ISE Posture with this deployment, let’s take a look at its profile options in Figure 25. ISE’s posture service scans endpoints for compliance with the security requirements of an organization. This allows you to provide differentiated network access to endpoints based on the degree to which they satisfy your organization’s security requirements.
If you choose to create a new ISE posture profile under Deployment Management, you will need to upload it to ISE. Otherwise, you can configure the posture profile you’ll be using in the ISE GUI. Most likely, you’ll want to use the latter setup.
Once you have configured Secure Client to your specifications, as in Figure 26 for example, and saved it, the Deployment Management service will generate executables for installation. The basic difference between the two options is that the Network Installer is the lightweight option. When you deploy with this option, once on the endpoint, the installer will download the rest of the installers configured in the deployment in the background.
When it comes to sharing the installer, you can simply share the URL where the file will be downloaded from, or you could upload it to a software management tool, and have it pushed to endpoints.
Conclusion
Deploying Secure Client using SecureX is a great way to install robust security on endpoints with minimum fuss. Of course, what we have discussed in this blog post is only half the story. You will need to enable and configure each of the services mentioned - e.g., the Umbrella roaming client, ISE Posture - so that once Secure Client is installed on the endpoint, it will actually provide the security function to the endpoint! Please feel free to get in touch if you have questions or comments about using SecureX to manage deploying security within your organization.