ISE 3.3.1 introduces MFA integration directly into Policy Sets. This important new feature currently only works with policy for Device Administration and VPN use-cases. In this blog post, we’ll take a look at how to programmatically build a policy set for Device Administration with an integrated MFA rule. And we’ll take this opportunity to look more generally at all the steps required to configure Device Administration on ISE using APIs.
As a prerequisite, you should already have configured a DuoConnection in your ISE deployment. If you have not done so already, please see my previous blog post on how to set this up using automation.
The code below can downloaded here. Be sure to replace variables (e.g., ISE server IP and credentials) with what is specific to your deployment.
1 - Enable Device Administration
Begin by enabling Device Administration in ISE.
Assuming you already have a deployment set up, you’ll utilize a PUT method to api/v1/deployment/{hostname}to update the node with Device Admin. If you are registering a new node, then you can use a POST method to api/v1/deployment/.
The hostname variable is the ISE node in your deployment that is responsible for Device Admin. In the below example, we are running in standalone mode, where all services are on a single server. If you are running a dedicated PSN node, that’s the server you’ll want to target.
Regardless, the key point is to include the DeviceAdmin variable under services in the payload.

2 - Enable TACACS on a Network Device
After enabling Device Administration in your deployment, you’ll want to enable it on the appropriate network devices.
If your network device is already on the network, then you can issue a PUT to ers/config/networkdevic/name{name}. If you are registering a new network device, then you’ll issue a POST to ers/config/networkdevice/. In the example below, we are going to do the latter.
The key point is to configure TACACS in the payload.

3 - Policy Elements
TACACS Policy elements include Command Sets and Profiles. Command sets focus on controlling the specific commands that users can execute on network devices, whereas profiles are broader constructs used to define comprehensive access control policies and attributes applied to users or devices accessing the network.
Let’s looks at an example of each.
TACACS Command Sets
To create a new command set programmatically, you issue a POST to ers/config/networkdevice/tacacscommandsets.
As noted above, command sets are used for granular access control. You can specify exactly which commands are allowed. In the example below, we are only granting the ability to issue the ping command and the show command.

TACACS Profiles
To create a new profile programmatically, you issue a POST to ers/config/tacacsprofile.
As noted above, compared to command sets, profiles are broader constructs. Access control depends on privilege levels.
In the example below, we are specifying a default privilege level of 1 and a maximum privilege level of 15.

4 - Policy
We begin by creating a new policy set using a POST to /api/v1/policy/device-admin/policy-set. The condition I am using in this policy is to use the network device that we added above, but of course you can configure any condition you would like.
Note that when a new resource like a policy set is created, ISE generates a unique ID to reference the policy set, as you can see in the image below.

Once of the challenges with programmatically writing rules for policy sets in ISE is that you have to reference the policy set ID in the API, as we’ll see momentarily.
To account for this, we are going to capture the ID in our code using the policyId variable.

MFA Rule
We’re now approaching the fruit of our labor, which is to incorporate MFA into a policy!
To do this we will issue a POST to /api/v1/policy/device-admin/policy-set/{policyId}/mfa, where policyID is the variable we captured above.
It’s important to reference the Duo Connection that we set up in a previous blog post. We can reference it by name instead of by resource number.

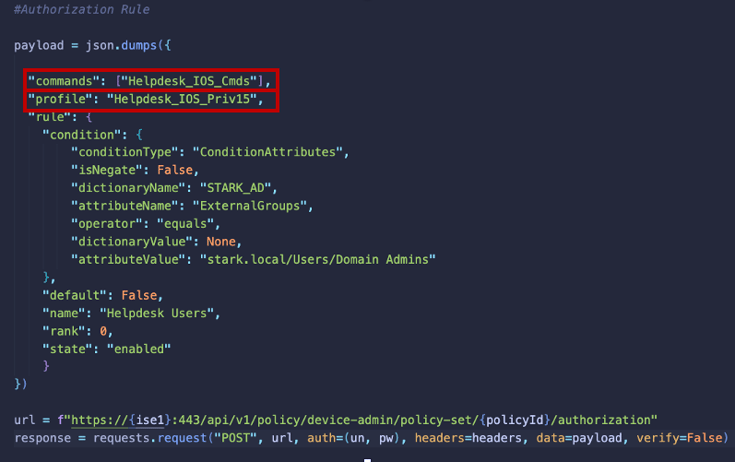
Authorization Rule
Finally, we’ll use the TACACS policy elements - that is, command set and profile - that we created above in an Authorization Rule.
To do this we will issue a POST to /api/v1/policy/device-admin/policy-set/{policyId}/authorization, where policyID is the variable we captured above. In this example, I’m matching on an external identity (AD) condition, but you can use whatever configuration you would like.
As above, we can reference the policy elements by name instead of by resource ID.
Conclusion
I hope this post on setting up a Device Admin Policy Set with MFA integration in ISE has been helpful. Please feel free to reach out if you have any questions or comments.