
Authentication tells ISE who or what is connecting. For a lot of devices, that isn't much. IP phones, printers, cameras, and badge readers often can't run 802.1X, so they authenticate with MAB, and their MAC address is the only credential they present. Profiling fills the gap. ISE collects attributes about the endpoint from the network — DHCP options, CDP and LLDP data, RADIUS attributes — and uses them to work out what the device is. Authorization can then act on that. Phones get voice access. Printers get printer access. Anything ISE can't identify gets less.
For most of ISE's history, profiling meant certainty factors. Each matching attribute adds points toward a profiling policy, and the highest-scoring policy wins. The result is one label per endpoint: Cisco-IP-Phone, Microsoft-Workstation, Apple-Device.
ISE 3.3 introduced Multi-Factor Classification (MFC). Instead of one label, each endpoint gets up to four: manufacturer, endpoint type, model, and OS. The labels are independent. Each can come from a different source, and authorization policy can match on any of them.
ISE 3.5 adds a new way to set those labels yourself. Custom MFC profiling policies replace certainty-factor scoring with plain if/and/or conditions. A policy's conditions match or they don't, and the policy assigns whichever labels you choose.
In this post, we will walk through creating a custom MFC profiling policy - from the attributes an endpoint reports to an authorization rule that acts on the result.
The problem: a phone that says more than its labels
Our lab has a Cisco IP Phone 6901. Out of the box, ISE profiled it as Cisco-IP-Phone.
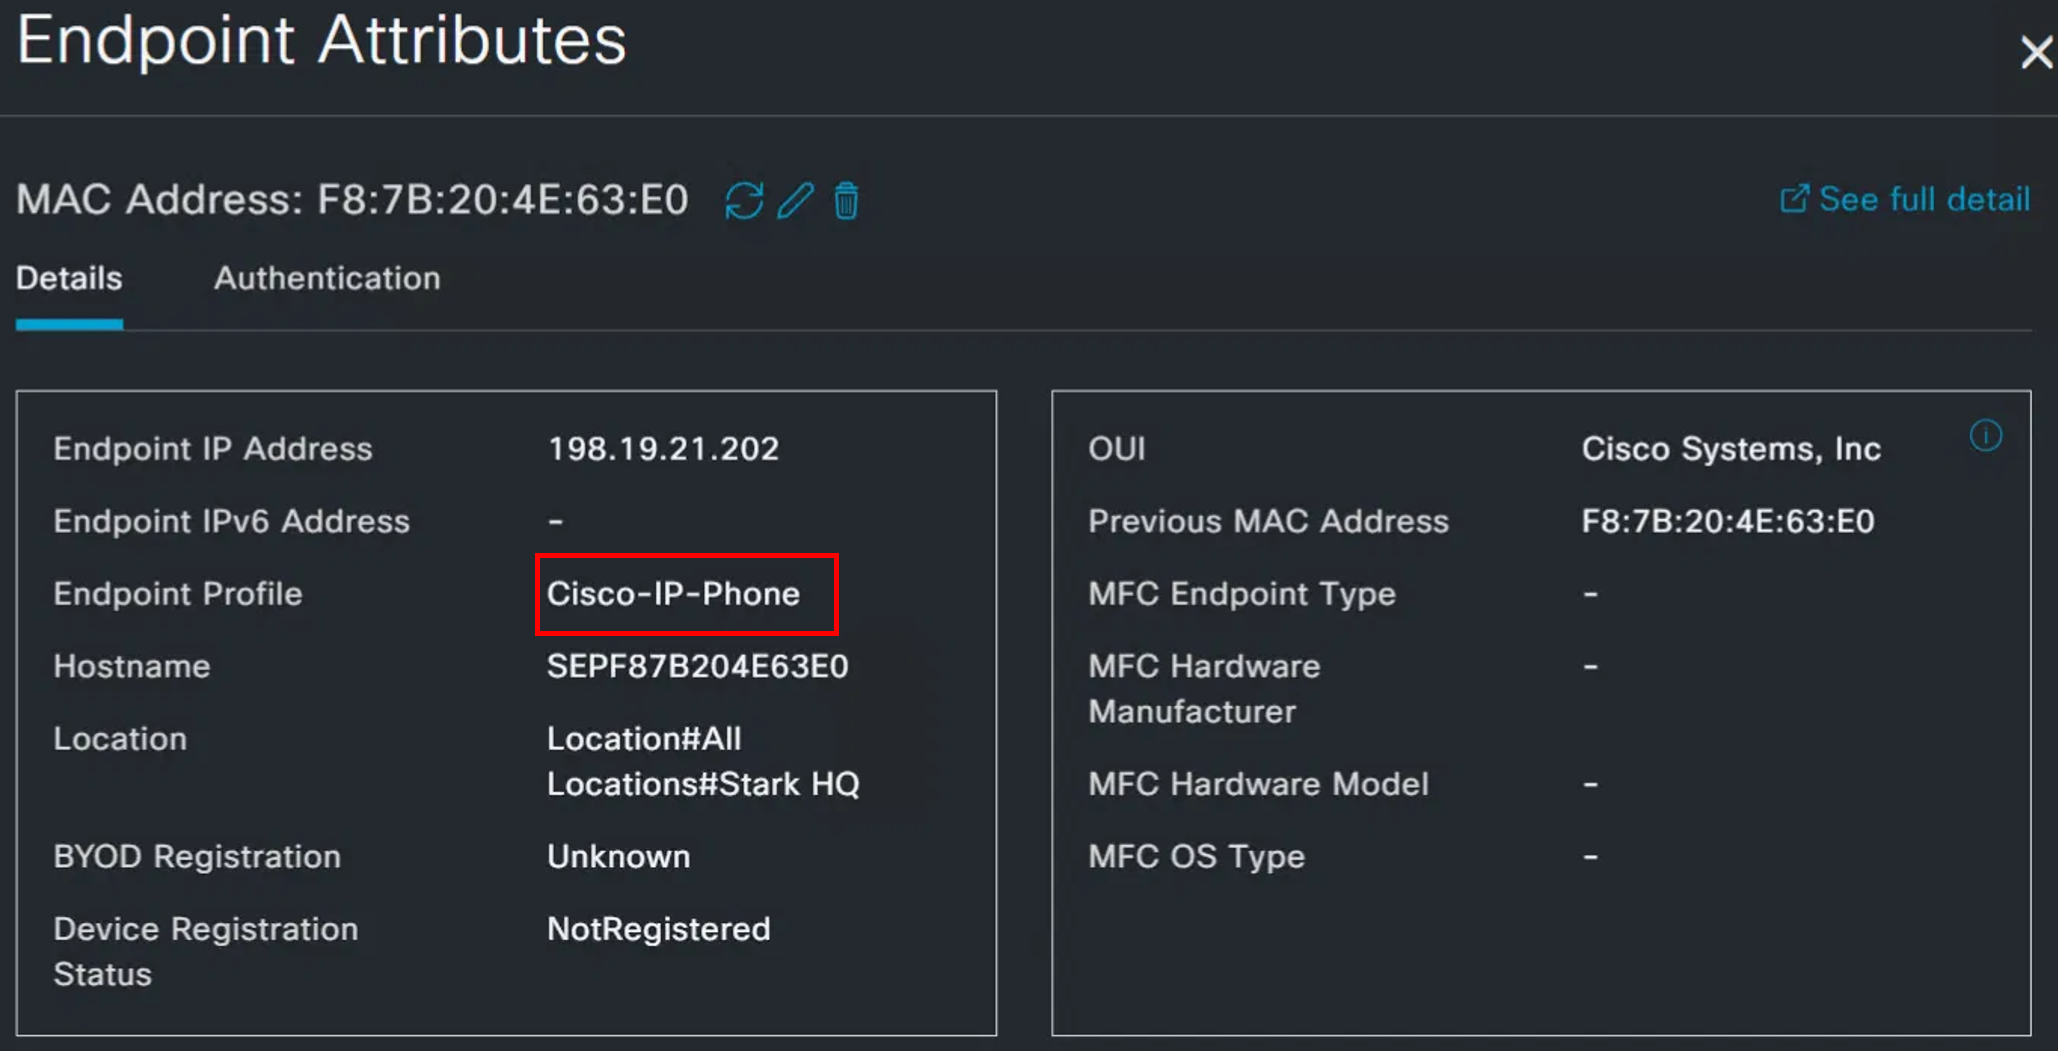
Accurate, but not much use. It doesn't say which model the phone is or what firmware it runs. Nothing here tells you which phones run old firmware, or which still use SCCP, Cisco's older call-signaling protocol.
The phone reports far more than that. To see every attribute ISE has collected for an endpoint:
- Navigate to Context Visibility > Endpoints and search for the endpoint's MAC address.
- Open the endpoint and click See full detail.
- Scroll through the attributes list. It includes everything ISE has learned from its probes and from your network devices: DHCP, CDP, LLDP, RADIUS, and more.
For this phone, the useful data comes from CDP. Device sensor on the access switch forwards the phone's CDP information to ISE in RADIUS accounting, and two attributes carry what we need:
- cdpCachePlatform: Cisco IP Phone 6901
- cdpCacheVersion: 6901SCCP.9-1-1-0
That's the exact model and the exact firmware load, including the fact that it's an SCCP image.
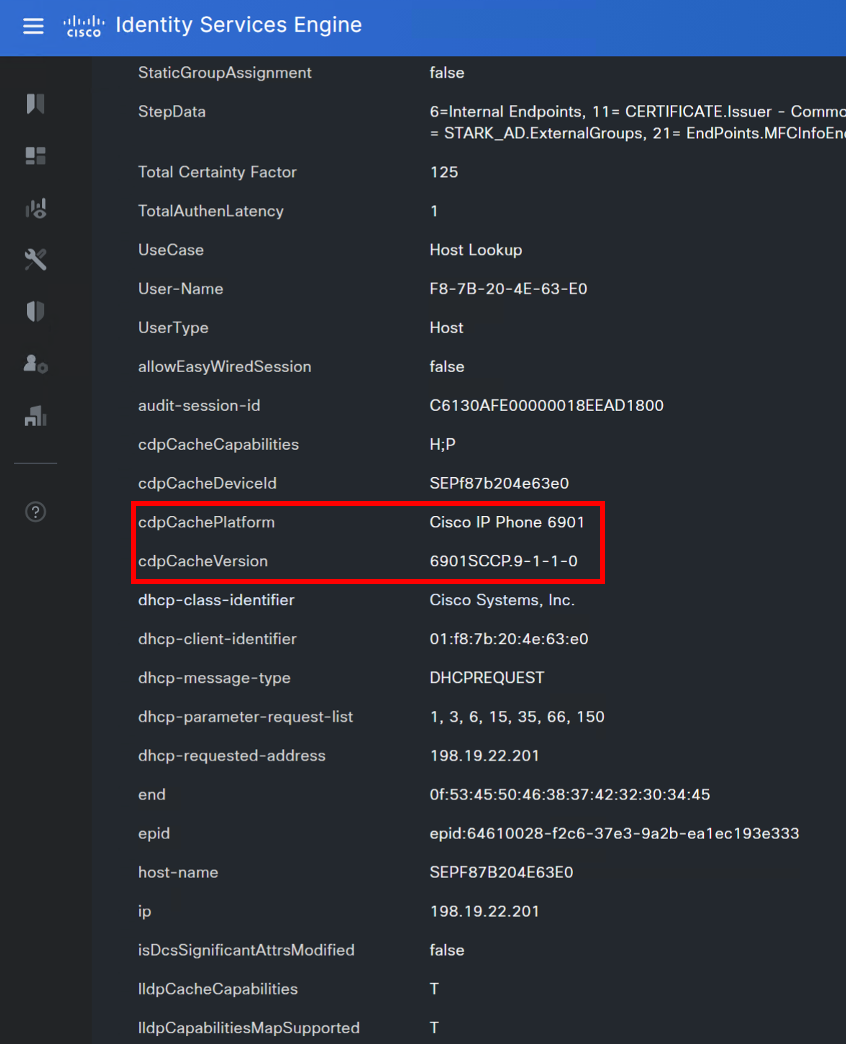
The data is already in ISE. A custom MFC policy turns it into labels.
Building the policy
- Navigate to Policy > Profiling.
- On the Multi-Factor Classification tab, click Add Profiling Policy.
- Give the policy a descriptive name.
- Set Status to Enable and Type to Custom.
- Under Conditions, open the Source & Attribute drop-down and pick the attribute you want to match. Choose an operator and enter the value.
- Click + Add Condition for each additional attribute. Leave the group operator set to AND if every condition must match.
- Under Result, set the labels you want the policy to assign. You need at least one. Pick an existing value from the drop-down where one exists. To create a new value, type it and click + Add.
- Click Continue, then Save.
For our phone, the policy uses three conditions:
- MAC: oui contains Cisco
- CDP: cdpCachePlatform contains IP Phone 6901
- CDP: cdpCacheVersion contains 6901SCCP.9-1
And assigns four labels:
- Manufacturer: Cisco
- Endpoint type: IP Phone
- Model: IP Phone 6901
- Operating Systems: SCCP 9.1 (a new value)
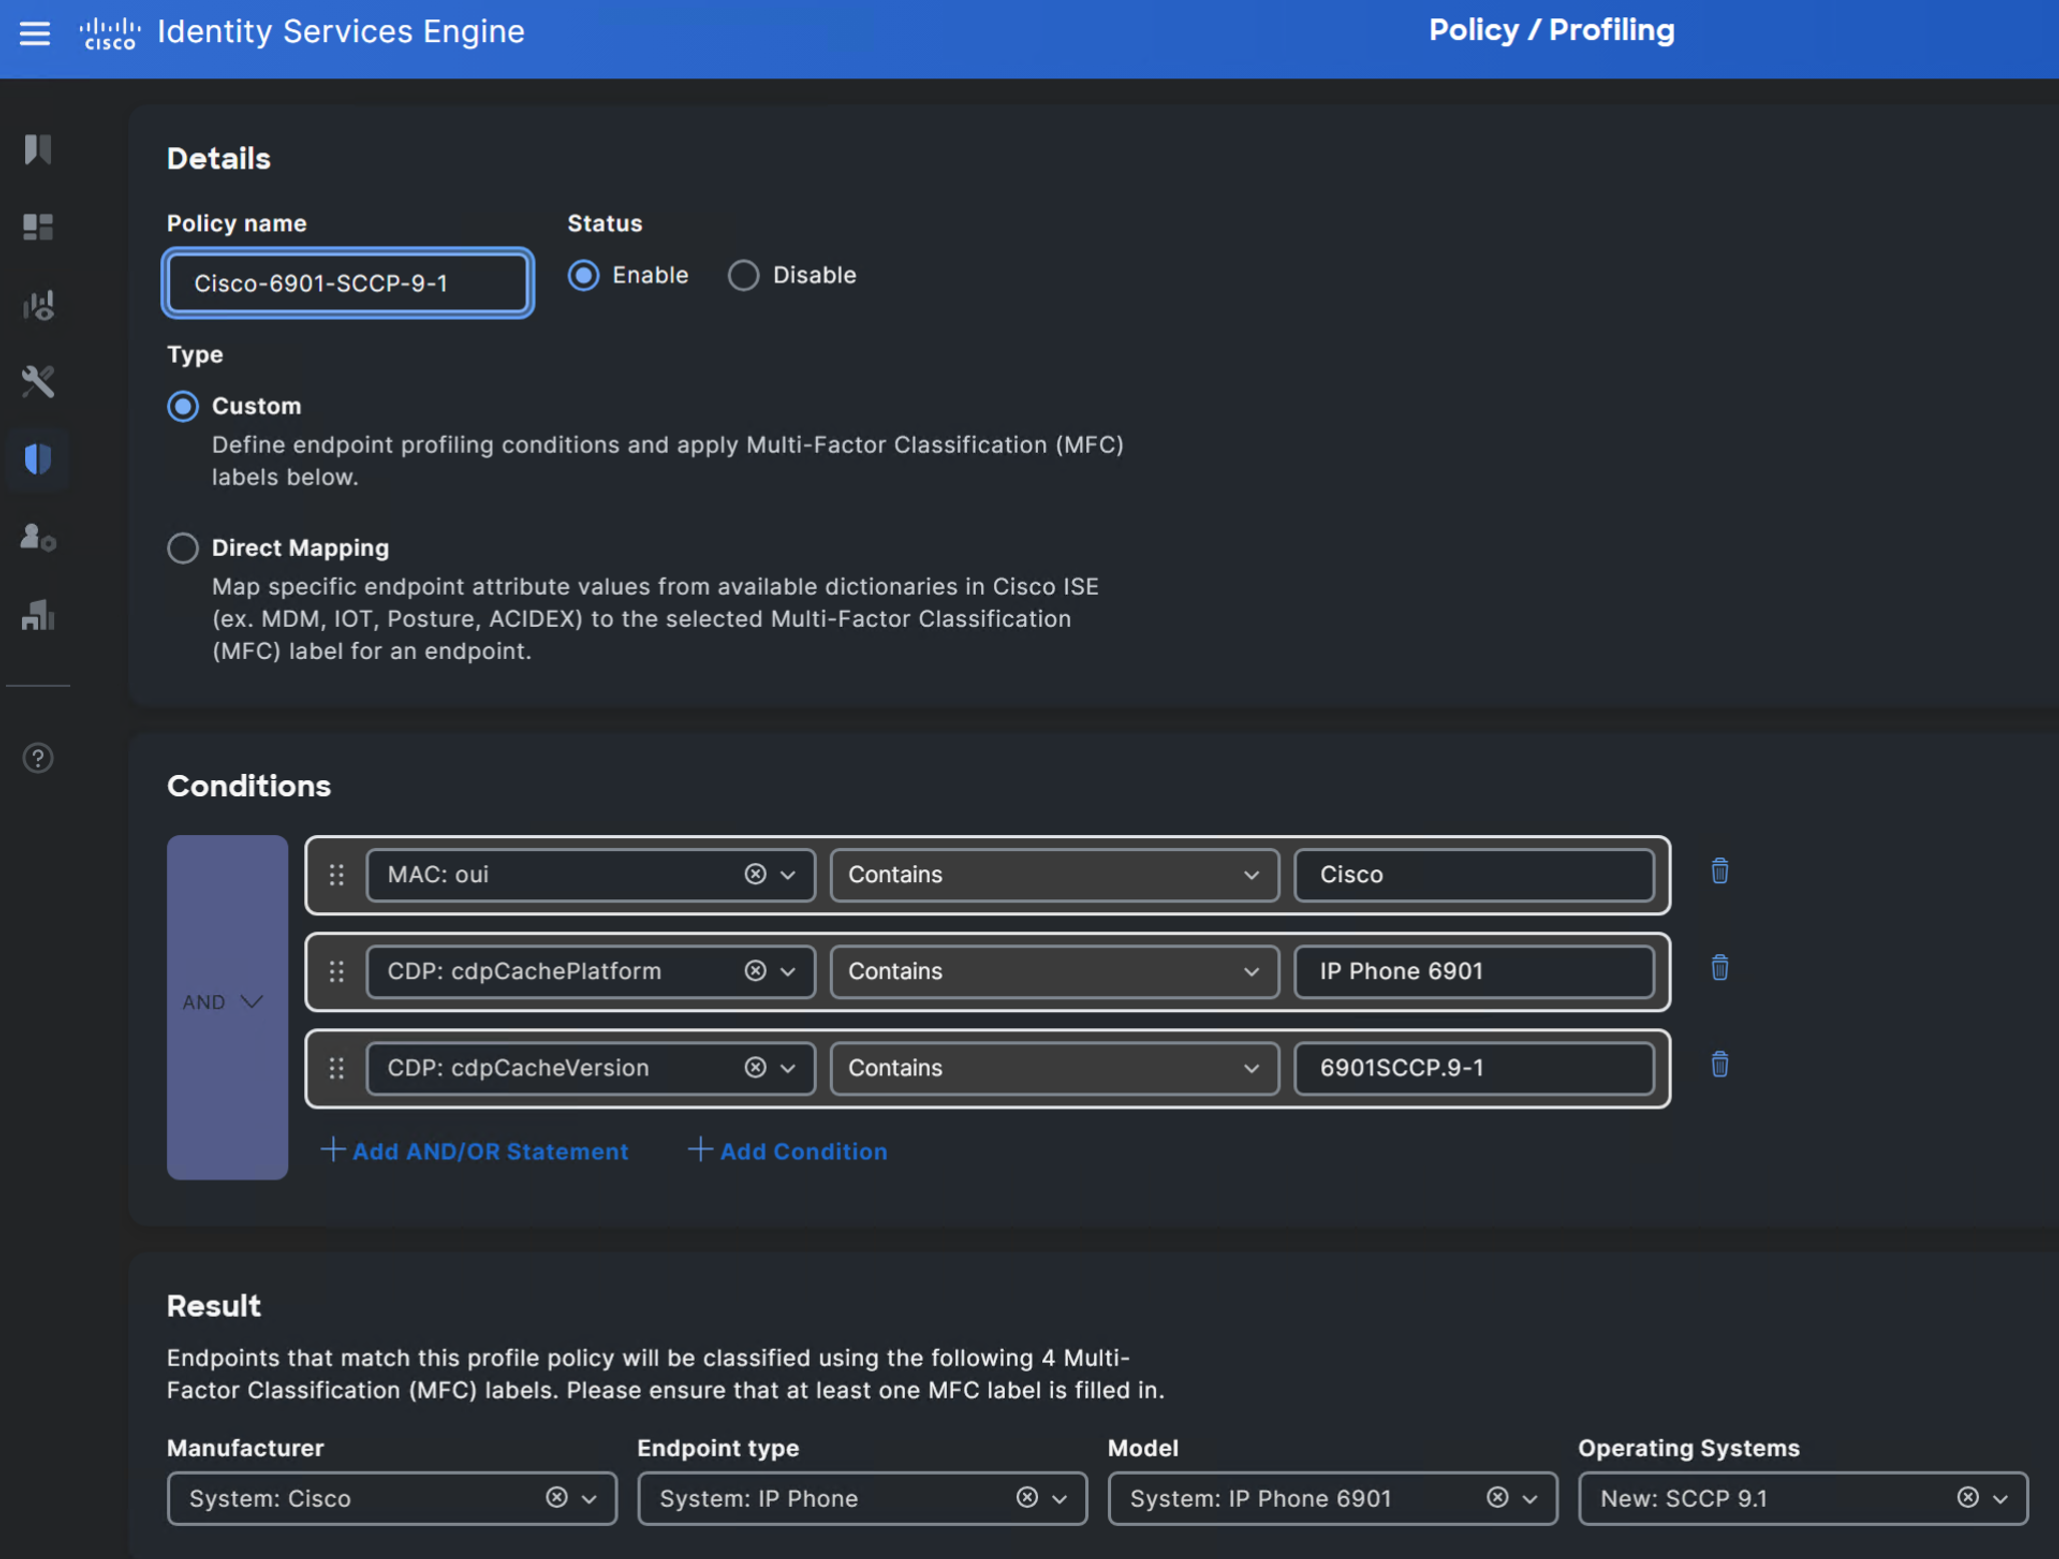
The result
When the phone reconnected, it carried four labels:
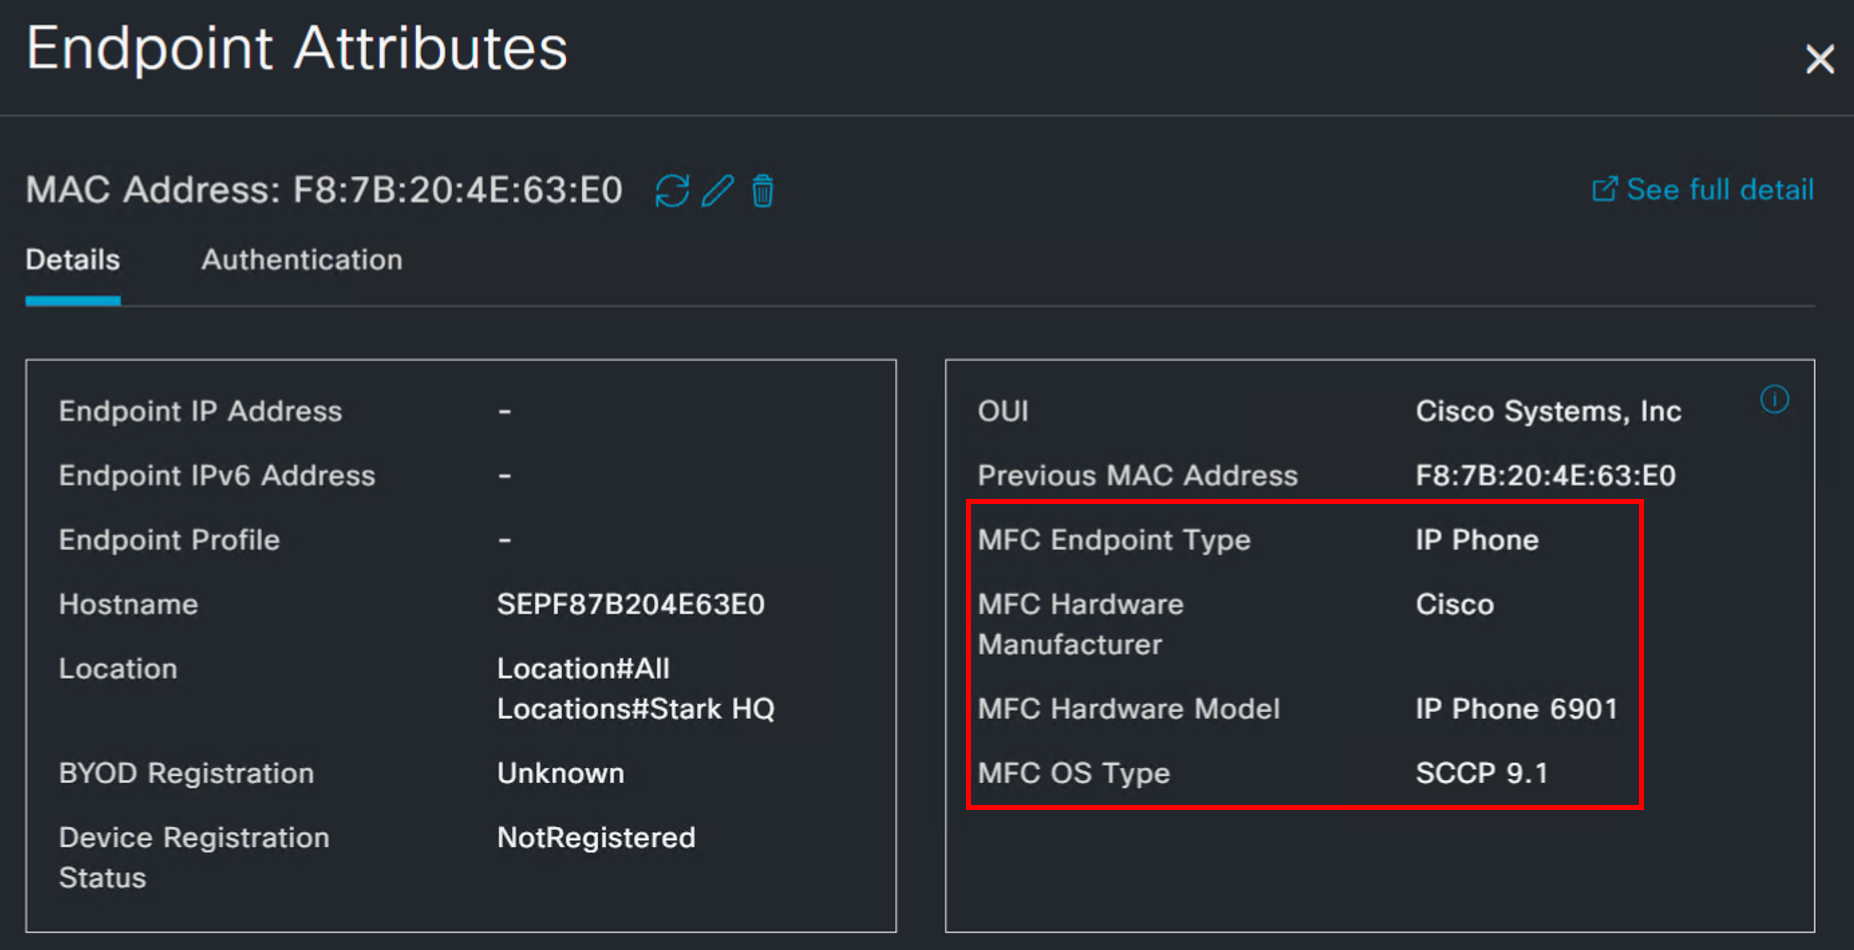
Compare that with Cisco-IP-Phone. The model is specific, and the OS label now carries the firmware, SCCP image included.
Enforcing on the label
A label is only useful if policy acts on it. Any MFC label can be a condition in an authorization rule. The labels live in the EndPoints dictionary as MFCInfoHardwareManufacturer, MFCInfoEndpointType, MFCInfoHardwareModel, and MFCInfoOperatingSystem.
- Create an authorization profile for the access you want the matching endpoints to receive.
- Navigate to Policy > Policy Sets and open the relevant policy set.
- Insert a new rule above any broader rule the endpoints would otherwise match.
- Set the condition to the MFC label and value you want to act on.
- Set the result to your authorization profile and click Save.
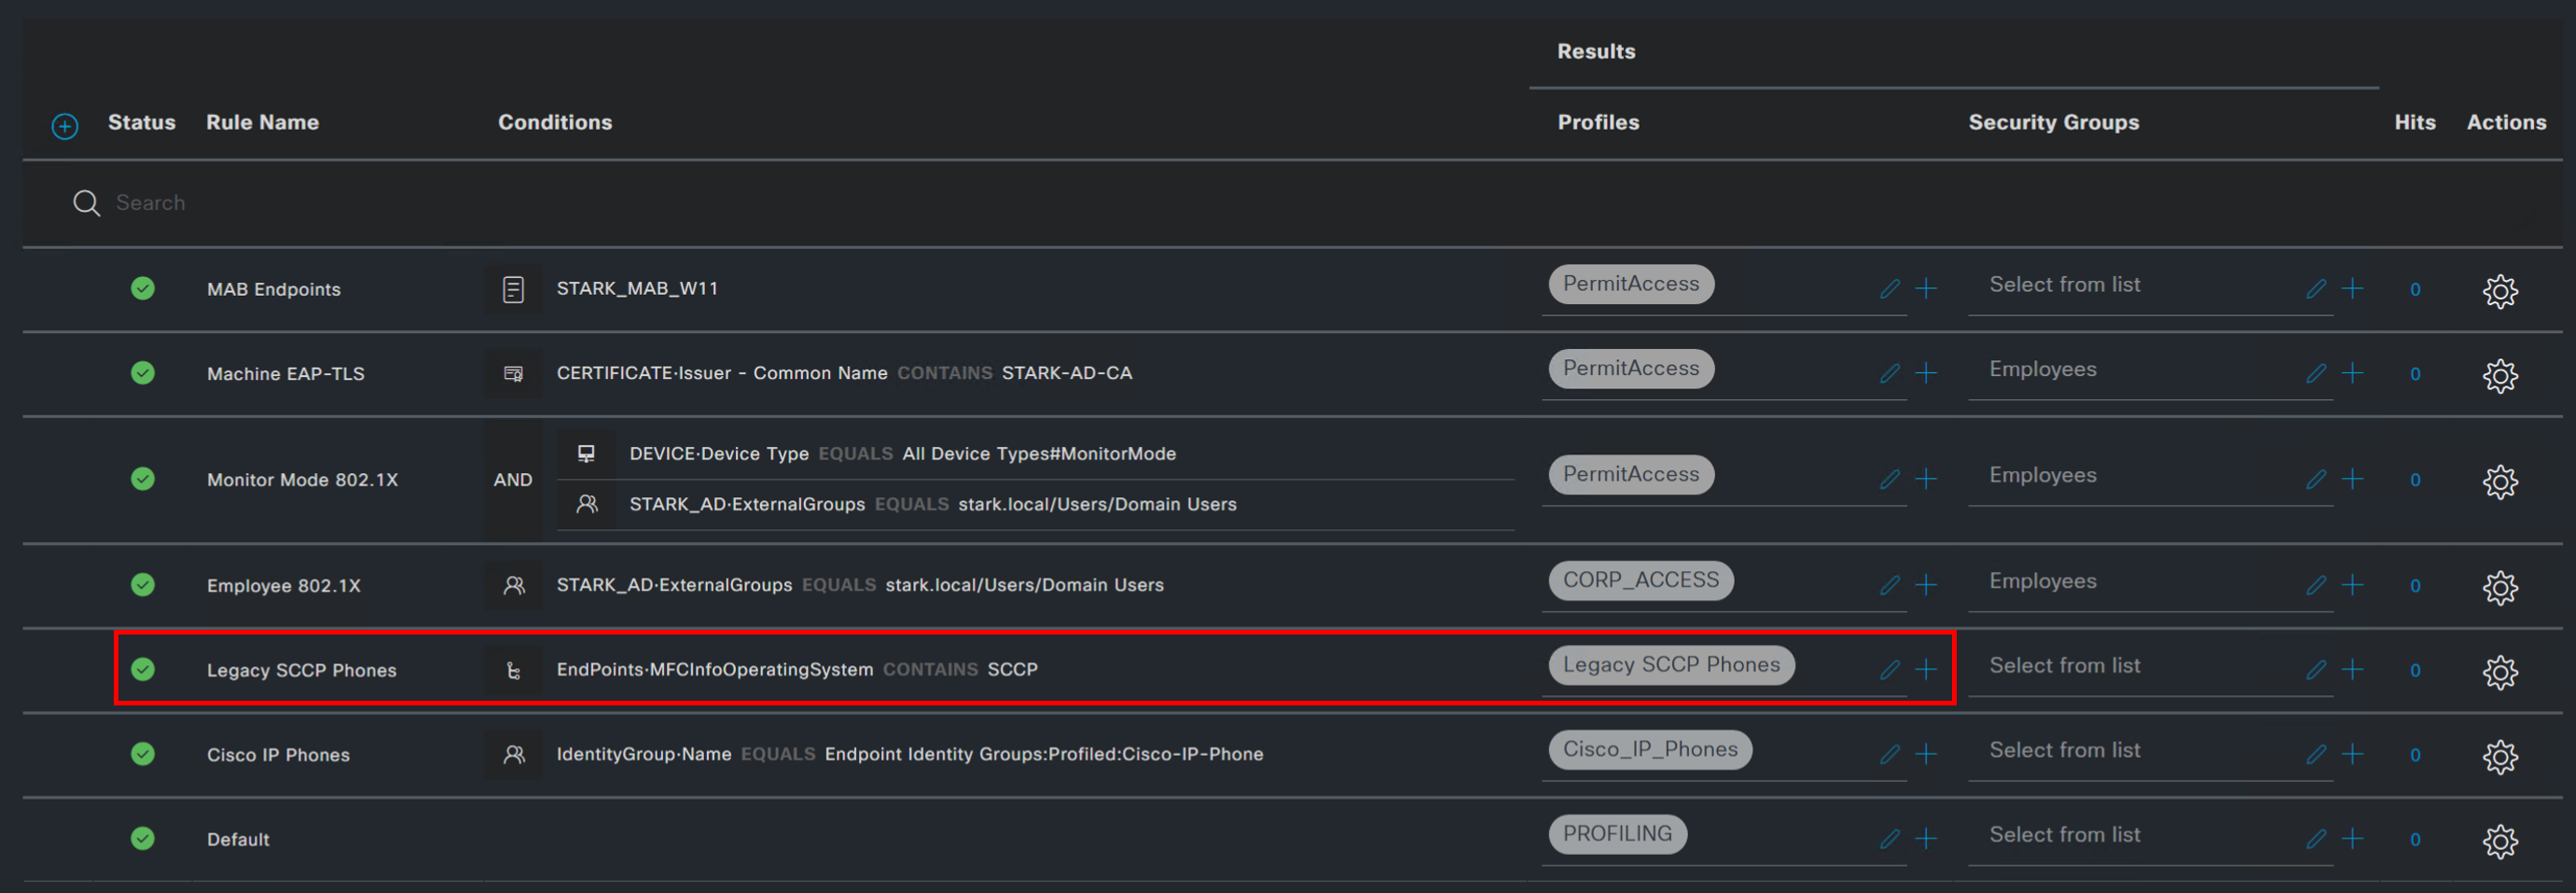
For our phone, the goal is to restrict phones running SCCP firmware. The rule looks like this:
- Name: Legacy SCCP Phones, placed above the existing IP phone rule
- Condition: EndPoints · MFCInfoOperatingSystem contains SCCP
- Result: an authorization profile that applies a restrictive downloadable ACL
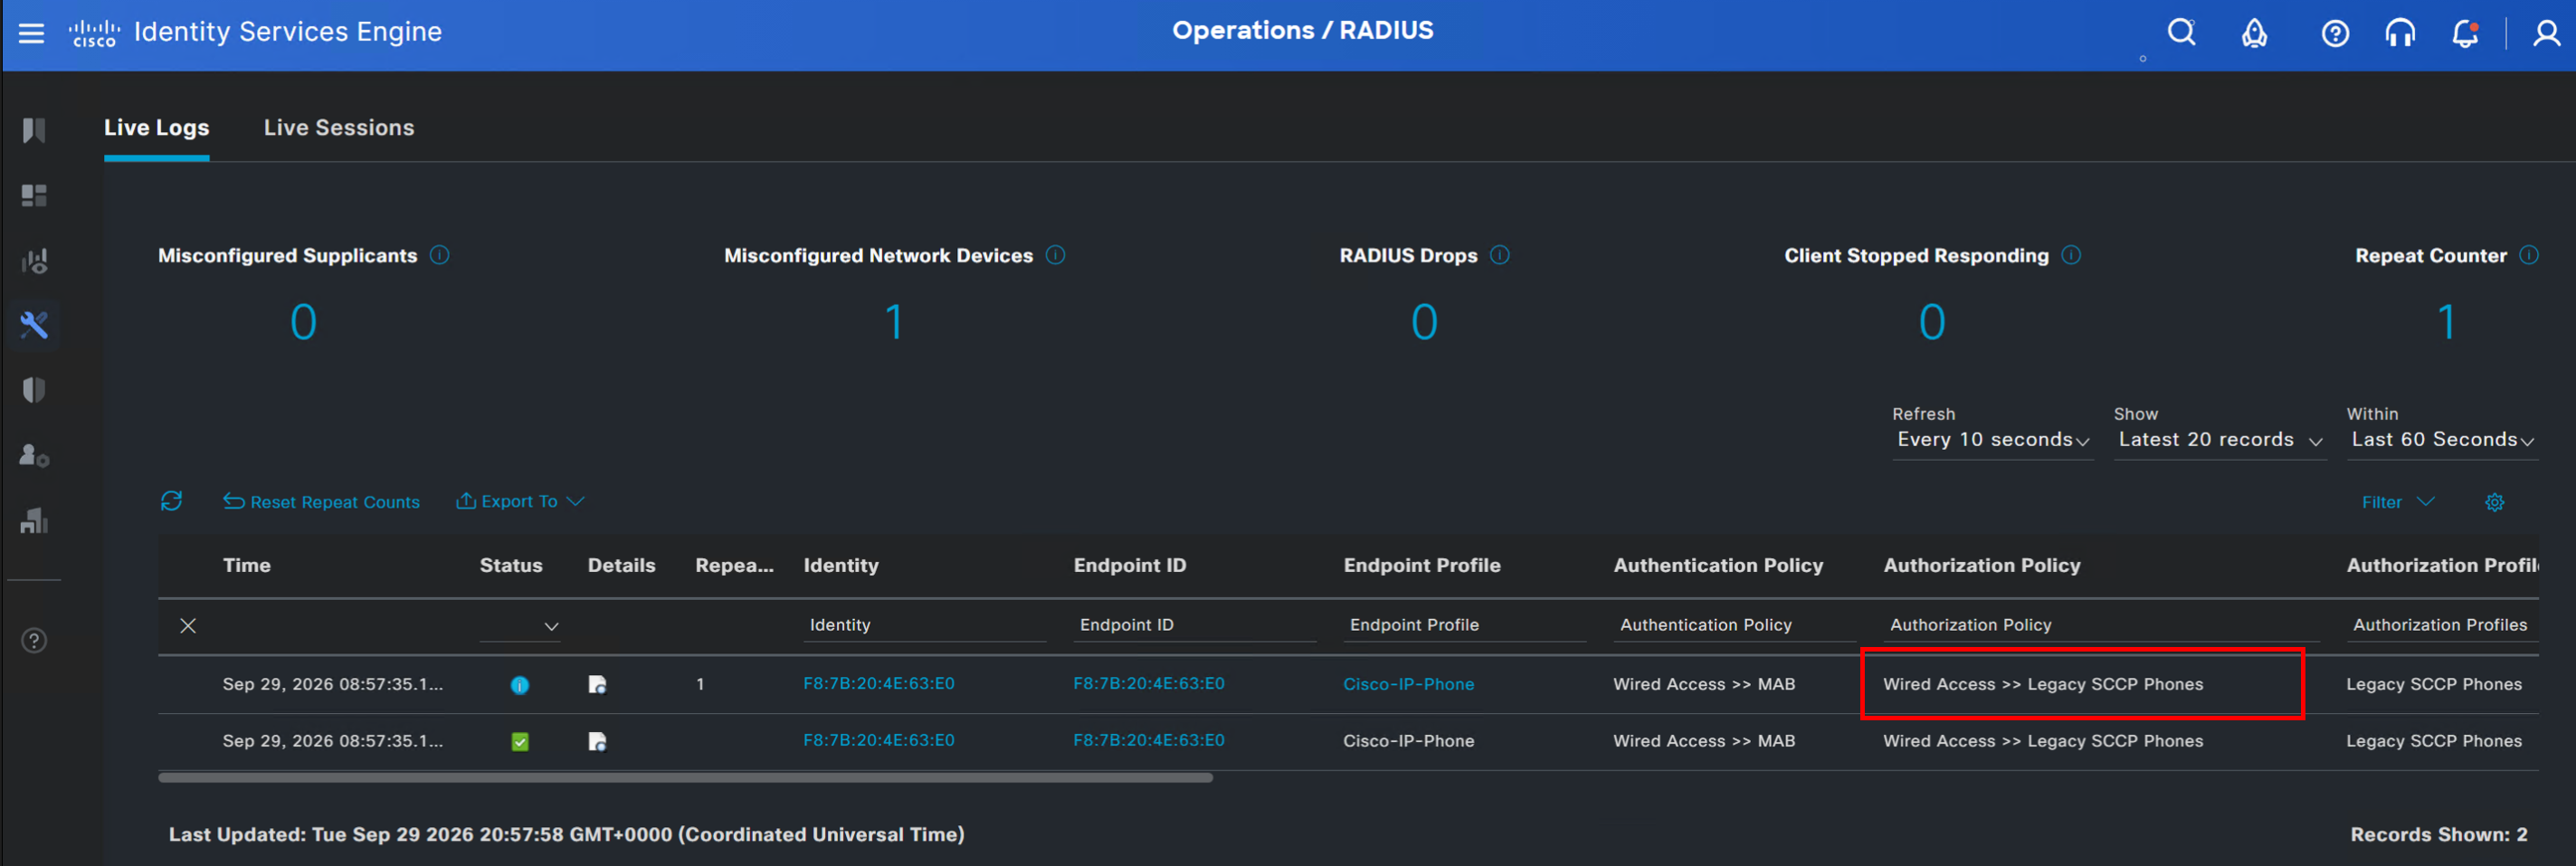
When the phone reauthenticated, it matched the new rule.
Conclusion
One custom policy, with three conditions and four labels, turned attributes ISE already had into labels specific enough to write policy against.
The same approach works for any device that reports more than ISE's default rules capture. Find the attribute that carries what you care about, write a policy that turns it into a label, and point an authorization rule at the label.
Please get in touch with your questions about profiling in ISE.
See it for yourself. Request a ModernISE Platform test drive at moderncyber.com/testdrive — or reach us at info@moderncyber.com.
Integrated · Agile · Zero Trust · AI